
The Power of StorySelling: The Complete Guide To Video Marketing
To build a thriving business that stands out from the competition, there is no doubt that using video will be your edge.

Studies show that show that 54% of consumers want to see more video content from a brand or business they support (via HubSpot, 2018).
In 2019, 87% of marketing professionals use video as a marketing tool (via Wyzowl); a trend that's set to rise all the more as the way we view content is weighted favorably towards the moving image - video.
Videos are powerful. Videos tell stories, build brand connection and trust, and impact audiences quickly.
But, it can all feel overwhelming (sound familiar?)
If the idea of producing your own video seems too out of reach, or ...you plan to hire a production company, but the price seems high, or... ...you try and do it yourself, but the pieces and parts that go into creating a video can be overwhelming, this guide is for you.

In this guide we will take you through every part of what it takes to create a great marketing video.
No matter what, this guide is going to save you thousands of dollars, hundreds of hours of time, and is designed to help your business get the impact and reach it deserves.
If creating an impactful video is a goal for your business, keep reading.

Without doubt, video is big news and will only continue to rise in effectiveness, so it's time to start reaching your audience, creating engagement, and seeing the ROI on your videos.
Our Video Marketing 101 online course is available 24/7 for you to plan your videos and start creating the impact you need for your business.
Click the link below to get started right away. For just $97 it's an investment that will reap big rewards for your business in no time at all.

See you in your video! Love Beth and the Mainstream team.
Chapter 1: What videos should I make? We’ll explore how to use video for your business and what videos to actually create (what we call 'pre-production')
Chapter 2: Capturing Your Video Production We'll walk you through what you need to capture for a great video, including filming, use of stock footage and photos (what we call 'production')
Chapter 3: Editing your video We go step by step into how to bring it all together to create a compelling video story that captures and speaks to your audience (what we call 'post production')
Meet Beth Klepper, Founder of Mainstream Video Production:

Meet the Mainstream Video Production Team
My whole life has been about creating videos.
I have a master’s degree in film and worked for a cable television network for 8 years.
I also teach public speaking at Metro State University in Denver.
In just the last 5 years, we have created over 1,000 video projects for 80 different organizations.

Chapter 1: "What videos should I make?"
Where is your video going?
The impact of your video is inextricably linked to the channel it will be on.
Are you planning to use your video on social media? On your website? At a conference?
Knowing where your video is going is key to constructing the video.
Ask yourself what channels you are already using to send your message.
Now, whether you said email, Facebook, LInkedIn, Twitter, or Instagram, you have your answer, or your “medium.”
Simply incorporate videos into the medium where you are already communicating.

What videos to make?
Once you know WHERE your videos are going, now you can figure out WHAT videos to make.
WHAT videos you should be making depends on what your sales and marketing goals are.
Your potential clients will go through a few stages before they are ready to buy your product or service, this is commonly referred to as a "sales funnel".
Watch Beth explain this in our video below:
You are already communicating different messages to potential clients, either by meeting, phone, email, or an in-person meeting.
To figure out WHAT video to make ask yourself how you could turn each of those conversations into a video.
Before you can turn on a camera, you need to know where your video is going to go and what the message will be.
Avoid Wasted Time and Money Producing Your Video
Before you decide on a visual concept and style for your video, you need to know what resources you have available for creating the video.
Consider money, of course, but also time: How much time are you willing to spend learning about sound, editing or lighting?
Setting a rough budget will help to streamline your decision making for your specific goal and keep you on task and organized.
We have a whole module on budgeting inside our Storyselling with Video course.
You can also access a free, worksheet on how to do that right here.

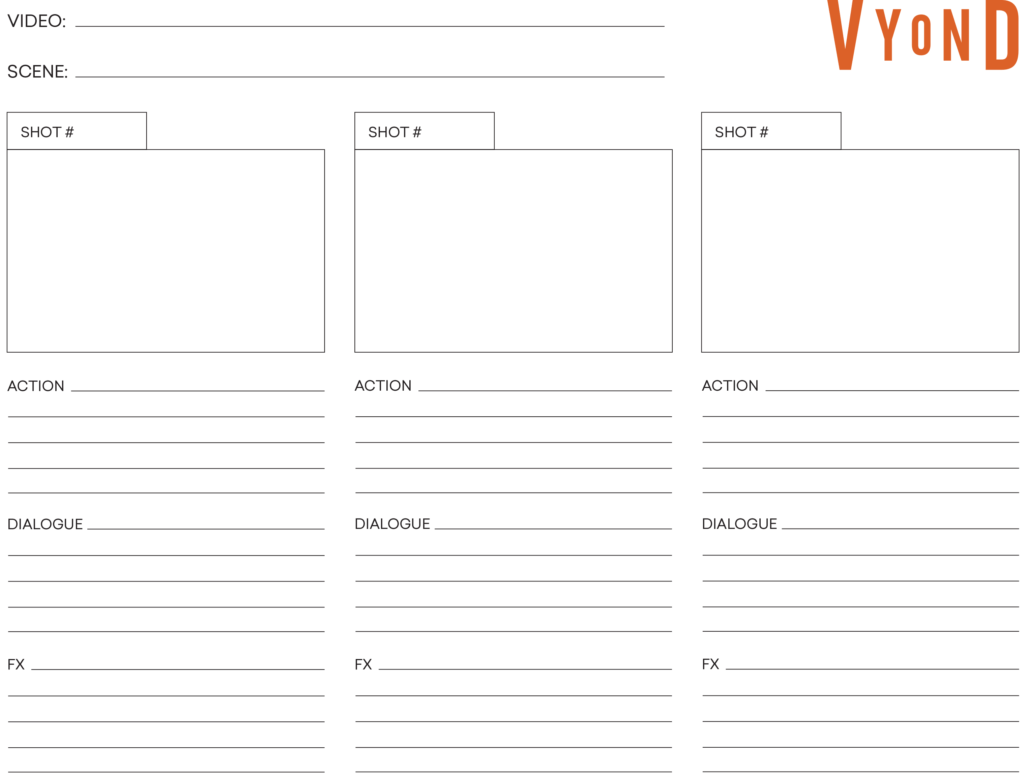
Create Your Video on Paper First
Whether a video production company is handling all this for you, or you are doing it yourself, you still need a video blueprint.
Most of us are used to writing a paper, or even a blog. Video scripts are a little different.
A storyboard includes the script (what you will hear) and the visuals (wh at you will see).
Beth explains the 3 simple steps to creating a script in the video below, with a storyboard example.
We also have a whole module on creating storyboards inside our Storyselling with Video course.
Chapter 2: Capturing your video production

Make the most out of your filming time
The next part of the pre-production process is to make a plan for gathering all your video assets, which usually involves filming.
However, this is not always the case. There are a lot of ways to create a video story without filming.
You could write a script and record it (voice over) and use stock footage or still photography to help visually tell your story.
You can also use animation.
What makes video so compelling is that it marries a lot of different art forms (narrative, visuals and music).
The production stage is when you get a plan to actually capture them all.
To do that you need a production schedule, which includes the basic who, what, where and how to make sure you gather all your assets correctly.

Filming Basics
If and when your story needs to be shot there are a couple filming basics to be aware of.
Filming is generally a skill that is honed over time.
The best videographers (also referred to as photographers, DP’s, or shooters) typically have been doing this for years.
My first recommendation will always be to hire one of these professionals to film your video project.
If you’re interested in hiring a contracted videographer and want to know about pricing and negotiating, consider taking our StorySELLing with Video Online Course.
Hiring a professional shooter will save you hours of time and create a much better raw video product.
If you arrange your production schedule efficiently you can get several months worth of content in one shoot.
However, if the DIY route is something that’s right for you, take a look at our free mini course on producing a sales video from start to finish. “6 Steps to Creating a Video that Turns Shoppers into Sales.”

Production specifics
Lighting, cameras and audio are topics we turn to the experts for.
Check out our conversation with technical expert Erica Jaffe of Staccato Productions to learn more about lighting, audio and setting up your shot.
Peruse through Mainstream’s FAQ on our YouTube channel.
Once you have captured all your footage you will need to prepare for editing. Editing is a completely different job than shooting, but a lot of times your shooter will also edit. Organization is key to saving money and time on editing.
Consider these three things:
- Update your storyboard as it changes.
- Get very specific on what sound bites you put on your storyboard
- Get very specific on what shots you want your editor to use (time codes are your friends.)
Now is also the time to get extra creative.
Figure out what you can show visually to support whatever it is you are talking about in your video. Are there stock footage options (we use video blocks), or still photos you could incorporate to bring the video to life? Include all of those visuals in the storyboard.
You will also need to include the raw video assets. The simplest way to do that is to create a shared online folder and include one folder for “a-roll” and one folder for “b-roll.”
The updated storyboard and the organized footage is all you need to complete the Production phase. You are now ready for post-production, AKA "editing".
Chapter 3: Editing your video
Post-Production
Now that you have shot – or had a professional shoot – a video for you, it’s time to edit.
You need two things to complete your edit:
- Editing software.
- An editor.
Again, we recommend hiring a professional. Even if I DIY an edit, I always budget in at least a couple of hours for an editor to finish things because it will save so much time and make the video product look SO much better.
Mainstream created a video on the do’s and don'ts of hiring an editor, which you can check out below:
Choosing your Editing Software
When it comes to editing software there are two main types.
1. There is consumer grade iMovie, MovieMaker and typically free softwares that come with your computer.
2. Then there is your professional grade software like Adobe Premiere Pro and Final Cut Avid.
It’s important to note, the consumer grade softwares make it really easy and there are some hybrids in there (for example we LOVE Animoto).
The main difference between the two is how much control you have over the project.
If you want to do a very specific kind of transition (or ask your editor to) you will need a professional software. If you are fine with what is laid out in a template, a consumer software will do you just fine.
The key with professional software is that you have to know how to use them. Otherwise, it’s like using a saw to cut a piece of cheese.

Putting it all together for storyselling with video
The storyboard and all the assets (organized nicely in your shared online folder) will be your template to edit your video. Our free “6 Steps to Creating a Sales Video” course covers editing basics.
A completed video isn’t enough, however. Now you have to get it in front of people.
We recommend hosting your video on YouTube or Vimeo. While there are pros and cons to both, I prefer YouTube. It is the best encoder and player, making it compatible with most computers. Vimeo is great too, and has a more polished look, but I get far more player problems with Vimeo.
After you have hosted it, get that link out there.
- If it’s a sales video, put it in your sales emails.
- If it’s “how to” content, post it to Facebook.
- If it works as an ad, you may want to explore using it on YouTube.

Further Resources
We hope this guide to StorySelling has helped you to feel more confident about using video in your marketing.
Without doubt, video is big news and will only continue to rise in effectiveness, so it's time to start reaching your audience, creating engagement, and seeing the ROI on your videos.
Our Video Marketing 101 online course is available 24/7 for you to plan your videos and start creating the impact you need for your business.
Click the link below to get started right away. For just $97 it's an investment that will reap big rewards for your business in no time at all.
See you in your video! Love Beth and the Mainstream team.